Here are some helpful links to further assist you in your proofreading and revising. Thank goodness for Internet!
http://www.reword.ca/?gclid=CJqJyPu48rACFeUBQAod7FamDA
http://writing.wisc.edu/Handbook/Proofreading.html
http://www.penandpage.com/EngMenu/prfread.htm
Thursday, 28 June 2012
A World Without Proofreading....
Can you imagine what would happen if we didn't proofread our work ?!
Some Proofreading Tips
Here are some tips to use while you proofread your work:
1.CONCENTRATE !
- Make sure that you are somewhere that is peaceful and quiet. Proofreading and revising is stressful as it is. You don't need more complications!
2. CHECK THE NUMBERS
- Make sure you remember to write out the numbers between one and twenty.
- Make sure you place the dollar sign in front of the number if used.
3.GET SOMEONE ELSE TO PROOFREAD
- After those long hours of hard work that you put into writting that ten page essay, your weary eyes might start to feel tired. This could lead you to miss some of the errors while proofreading. This is why it's always good to get someone else who's relaxed and not stressed out to read over your work.
Why It's Important to Proofread
Here is a short clip of how some our essays could be if we did not proofread. FUNNY!
Completing a Document
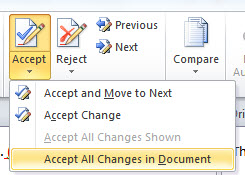
 Now that you have gone through all the steps and have completed your editing, proofreading and revising, you are now ready to complete your document. This is the final step in your amazing journey with Microsoft Word. This is where you will accept or reject all the changes you have made and then finalize it. This is done by clicking on the Review menu tab, where you will see the "Accept" or "Reject" buttons. You will also see the "Next" button which will allow you to come back to those changes you are not quite sure of yet. Once you complete this step you are now ready to print out your document and without a doubt receive that A you have always been waiting for.
Track Changes
The Track Changes button allows you to review all the changes you have made during your journey into proofreading.This feature becomes very handy when doing a group project because it allows each member to make their own changes and then later be credited for the revising they have done. Because this is such a lengthy process, I have included a video below that takes you through a virtual tour on how to use this feature. So sit back and enjoy the short clip.
Highlight and Font
Although Microsoft Word is a very intelligent software, it doesn't always catch every single error and mistake. Therefore, to ensure maximum revising you must proofread your work yourself as well as Microsoft. But hold on a minute !
Put away those pink, green, blue, and whatever other colors of highlighters that you have sitting on your desk. And for goodness sake, save the trees and refrain from printing out copies of your work just to proofread. Word has its own electronic highlighters. Under the home menu tab there are the Highlight and Font colour buttons that you can use to highlight anything in your document or change the color of your font.
Put away those pink, green, blue, and whatever other colors of highlighters that you have sitting on your desk. And for goodness sake, save the trees and refrain from printing out copies of your work just to proofread. Word has its own electronic highlighters. Under the home menu tab there are the Highlight and Font colour buttons that you can use to highlight anything in your document or change the color of your font.
The Basics - Proofreading
You may notice as you're writing your essay or project, that Word will do some weird things like add a red or green squiggly line to your words. Like so:
Not to worry! These underlines are a reminder that you either misspelled a word or there is a grammar error within your sentence. All you have to do is right click on top of the word with your mouse and a box will appear with the correction of the word. For grammatical errors you can always rephrase the sentence yourself or right click the word with your mouse and click on the option: About This Sentence.
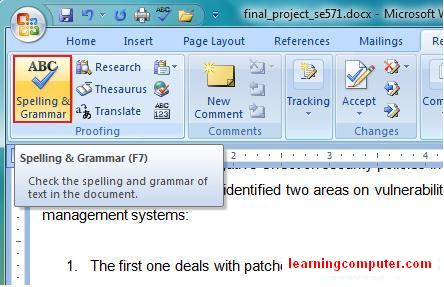
Although right clicking words with your mouse are short cuts, Word will always have the proofreading tools under the Review tab at the top of your page. Once you click the option of Review, you will see on the top left corner the three options of Spelling&Grammer, Research and Thesaurus.

ITS SIMPLE
Not to worry! These underlines are a reminder that you either misspelled a word or there is a grammar error within your sentence. All you have to do is right click on top of the word with your mouse and a box will appear with the correction of the word. For grammatical errors you can always rephrase the sentence yourself or right click the word with your mouse and click on the option: About This Sentence.
Although right clicking words with your mouse are short cuts, Word will always have the proofreading tools under the Review tab at the top of your page. Once you click the option of Review, you will see on the top left corner the three options of Spelling&Grammer, Research and Thesaurus.

ITS SIMPLE
The Strikethrough
Sometimes you come across certain words or even full sentences that you are not quite sure that you want to keep. With the strikethrough, it allows you to put a line across these words or sentences so you do not forget what they were. Instead of deleting it and later realizing that you still do need it, you can simply do this. STRIKETHROUGH THE SENTENCE OR WORD.
The Strikethrough can be found under the home menu tab and is called the Strikethrough button. To use this button effectively you must first choose and select the words or sentence that you wish to strikethrough and then click the strikethrough button. Easy huh ?
BUT WAIT ! THERE'S MORE!
Don't worry it's easy! You can also use the feature of a double strikethrough. Maybe there are certain sentences or words that you are more likely to keep than others so the double strikethrough can outline the importance of it. Or maybe you want to use the one strike or two strike for different meanings such as grammer or words that you need to look up the meaning for. It's all up to you.
Here's how:
Using Microsoft Word to Edit and Revise
Why should we revise ? ...
Apart from the fact that nowadays revising and proofreading takes a huge toll on the mark you receive on your essay and or assignment, proofreading allows you to organize yourself and your ideas. It also allows you to reconsider your arguments to see if they are valid and moral, and as well as refine your grammar so that your document makes sense to the reader.
So you've written your draft work for an essay or an assignment and you are now moving on to the editing part.. HOW IS IT DONE ??
This blog will teach you the basic editing skills you need to revise all your work on Microsoft Word.
Subscribe to:
Comments (Atom)


